Difference between revisions of "Ingrid/Blogs"
Jump to navigation
Jump to search
| Line 32: | Line 32: | ||
*Users could even check use the blog as a website by unchecking all the settings. | *Users could even check use the blog as a website by unchecking all the settings. | ||
[[File:Create_blog.JPG|400px|thumb|center|Create Blog]] | [[File:Create_blog.JPG|400px|thumb|center|Create Blog]] | ||
| + | |||
| + | ==Create Blog Post== | ||
| + | *Once the Blog is created, user will be redirected to create Blog post | ||
| + | *Blog Posting page contains heading part, Content part, Category, Tags and Post to Blog. | ||
| + | *Any type of contents like images, text, videos, embed codes, HTML etc can be added | ||
| + | *Category is used in which the blog should be listed. | ||
| + | *Tags that are related to the blog post can be added | ||
| + | *The blog post created can be posted to any other Blogs created | ||
Revision as of 03:13, 11 April 2014
Features
- Able to create private or public blogs related to any topics.
- Blogs can be viewed in Tiled or List.
- By default, the blog is public.
- HTML editor helps the users to modify the style of the blog contents.
- Category can be added to blogs while creating it.
- Its possible to upload images to form the Blog cover.
- Once the Blog is created, we could create new Blog Postings with tags for search help.
- Able to upload images and videos for the Blog contents.
- The first image or video uploaded in the Blog post will be the default thumbnail image of the Blog post.
- The "Save us draft" option helps the users to save the incomplete Blog as a draft without publishing it.
- The Like, Dislike and Comment option helps the users to express the views about the Blog.
- Share option helps the users to share the Blogs to Ingrid slate, Facebook, Twitter and Google+.
- Users can also send the blog as email to different people.
Create Blogs
- User could create Blog once logged in.
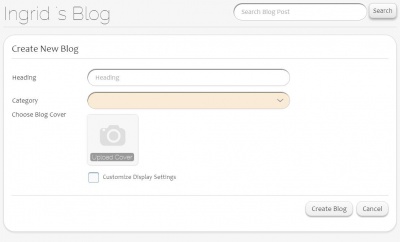
- On the top right corner, click on B+ icon to create new blog.
- Enter Blog Heading, Category and Choose Blog Cover Image.
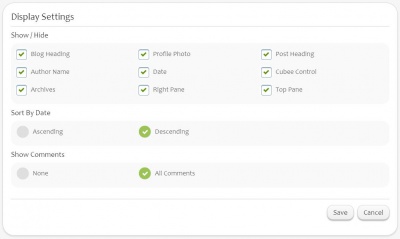
- Inorder to change the display setting, check the “Customize Display Settings” and click Next.
- The page will be redirected to Display Settings Page.
- Check or uncheck all the items under Show/Hide.
- This will Show/Hide the items we checked or unchecked.
- Inorder to disable the comments visibility, check None item under the Show Comments .
- Save the Settings and it will redirect to the Blog Post page.
Blog Display Settings
- Display Settings page contains numerous settings which can be checked or unchecked to Hide or Show
- According to this setting, the blog will appear to a user
- Users could even check use the blog as a website by unchecking all the settings.
Create Blog Post
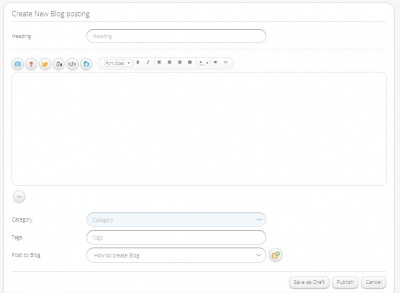
- Once the Blog is created, user will be redirected to create Blog post
- Blog Posting page contains heading part, Content part, Category, Tags and Post to Blog.
- Any type of contents like images, text, videos, embed codes, HTML etc can be added
- Category is used in which the blog should be listed.
- Tags that are related to the blog post can be added
- The blog post created can be posted to any other Blogs created
View Blogs
- The Home button at the top redirects to the users Blogs home page.
- The user will be prompted to login, if the user is not logged in.
- The Ingrid button i at the top right corner will redirect the user to Ingrid Blogs public page.


