Difference between revisions of "Websites"
| Line 1: | Line 1: | ||
The content display mode of a blog can be set to 'Website' mode. | The content display mode of a blog can be set to 'Website' mode. | ||
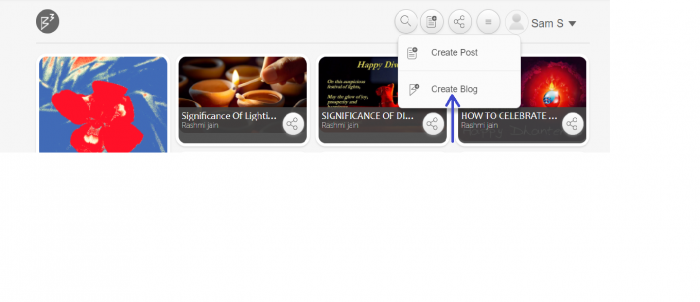
| − | Step 1: Click on B^3 icon. Select 'Create Blog' option as shown. | + | '''Step 1''': Click on B^3 icon. Select 'Create Blog' option as shown. |
[[Image:Wiki_B3_Website3.png |700px]] | [[Image:Wiki_B3_Website3.png |700px]] | ||
| Line 7: | Line 7: | ||
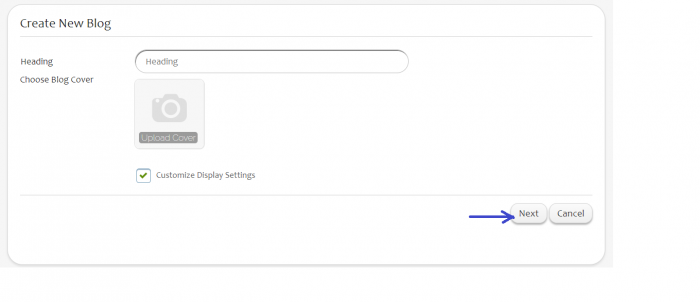
| − | Step 2: Enter the new blog name. Select 'Customize Display Settings' options. Select the 'Next' button. | + | '''Step 2''': Enter the new blog name. Select 'Customize Display Settings' options. Select the 'Next' button. |
[[Image:Wiki_B3_Website4.png |700px]] | [[Image:Wiki_B3_Website4.png |700px]] | ||
| Line 13: | Line 13: | ||
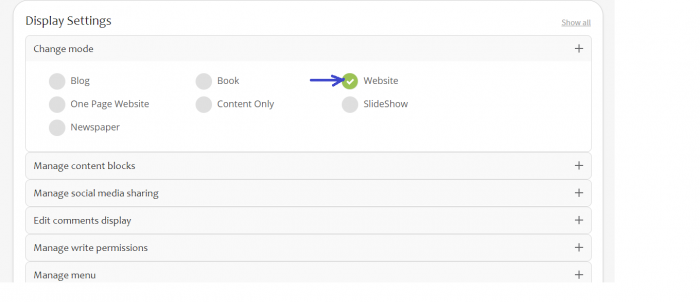
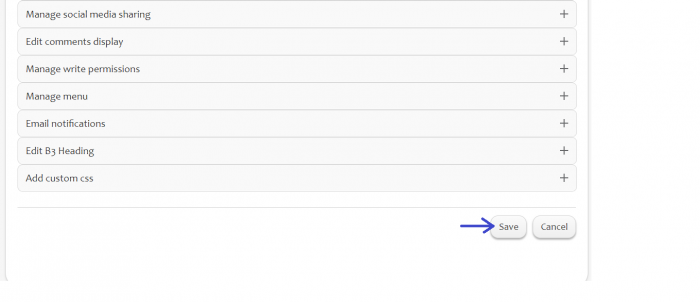
| − | Step 3: This page displays various settings that can be applied to the blog page. Select 'Website' or 'One Page Website' depending on the length of the text. Save the settings. | + | '''Step 3''': This page displays various settings that can be applied to the blog page. Select 'Website' or 'One Page Website' depending on the length of the text. Save the settings. |
[[Image:Wiki_B3_Website1.png|700px]] | [[Image:Wiki_B3_Website1.png|700px]] | ||
| Line 22: | Line 22: | ||
| − | Step 4: Now add the blog post under this newly created blog. The post gets displayed in website format. | + | '''Step 4''': Now add the blog post under this newly created blog. The post gets displayed in website format. |
[[Image:Wiki_B3_Website5.png|700px]] | [[Image:Wiki_B3_Website5.png|700px]] | ||
| Line 33: | Line 33: | ||
| − | Note: The display format of the blog can be re-changed anytime to any other format such as Blog, Book, Slideshow etc. through 'Display Settings' icon. | + | '''Note''': The display format of the blog can be re-changed anytime to any other format such as Blog, Book, Slideshow etc. through 'Display Settings' icon. |
Revision as of 00:03, 11 October 2017
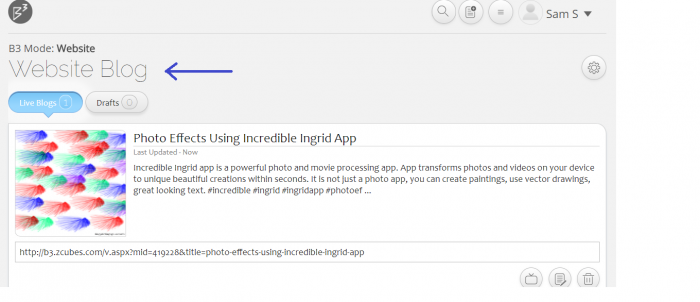
The content display mode of a blog can be set to 'Website' mode.
Step 1: Click on B^3 icon. Select 'Create Blog' option as shown.
Step 2: Enter the new blog name. Select 'Customize Display Settings' options. Select the 'Next' button.
Step 3: This page displays various settings that can be applied to the blog page. Select 'Website' or 'One Page Website' depending on the length of the text. Save the settings.
Step 4: Now add the blog post under this newly created blog. The post gets displayed in website format.
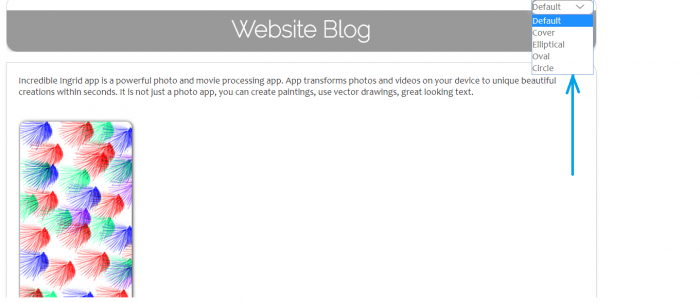
The cover image of the blog can be set to displayed as Default, Cover, Elliptical, Oval or Circle.
Note: The display format of the blog can be re-changed anytime to any other format such as Blog, Book, Slideshow etc. through 'Display Settings' icon.
