Difference between revisions of "InGridApp/Create Photo Display Wall"
Jump to navigation
Jump to search
Njackson100 (talk | contribs) |
Njackson100 (talk | contribs) (→Steps) |
||
| Line 12: | Line 12: | ||
#Draw a rectangle by selecting the rectangle shape icon. http://images.zcubes.com/iconset/photopaint/Rectangle_2.png | #Draw a rectangle by selecting the rectangle shape icon. http://images.zcubes.com/iconset/photopaint/Rectangle_2.png | ||
#Press the fill color icon and change the fill color. http://images.zcubes.com/iconset/photopaint/Fill-color_2.png | #Press the fill color icon and change the fill color. http://images.zcubes.com/iconset/photopaint/Fill-color_2.png | ||
| − | #Select rectangular photo frame. http://images.zcubes.com/iconset/photopaint/rectangular-picture-frame.png Draw the rectangle. | + | #Select rectangular photo frame. http://images.zcubes.com/iconset/photopaint/rectangular-picture-frame.png Draw the rectangle.<br/> A dialogue box will appear. Select a photo. |
#Select round frame. http://images.zcubes.com/iconset/photopaint/circular-picture-frame.png Draw the round frame. Select the photo to be placed within. Change the stroke color of the frame, if needed by selecting the stroke icon.[[File:Stroke-color_2.png]] | #Select round frame. http://images.zcubes.com/iconset/photopaint/circular-picture-frame.png Draw the round frame. Select the photo to be placed within. Change the stroke color of the frame, if needed by selecting the stroke icon.[[File:Stroke-color_2.png]] | ||
#Select another frame and select a photo. http://images.zcubes.com/iconset/photopaint/rectangular-picture-frame.png | #Select another frame and select a photo. http://images.zcubes.com/iconset/photopaint/rectangular-picture-frame.png | ||
| − | #Select box text icon http://images.zcubes.com/iconset/photopaint/Textbox_2.png | + | #Select box text icon http://images.zcubes.com/iconset/photopaint/Textbox_2.png and write some text. |
| + | #Place the rectangle in whatever position you like. | ||
#Press save icon to save it to device. [[File:Save_2.png]] | #Press save icon to save it to device. [[File:Save_2.png]] | ||
| − | |||
| − | |||
==Video== | ==Video== | ||
Revision as of 09:49, 1 June 2016
How to do Creative Photo Display
Introduction
Photo displays are a excellent way to organize and show your pictures to others.
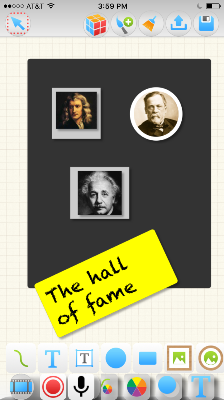
Let us examine how to create a photo display wall like the hall of fame shown here.
Steps
- Draw a rectangle by selecting the rectangle shape icon.

- Press the fill color icon and change the fill color.

- Select rectangular photo frame.
 Draw the rectangle.
A dialogue box will appear. Select a photo. - Select round frame.
 Draw the round frame. Select the photo to be placed within. Change the stroke color of the frame, if needed by selecting the stroke icon.
- Select another frame and select a photo.

- Select box text icon
 and write some text.
 - Place the rectangle in whatever position you like.
- Press save icon to save it to device.

Video
This video demonstrates how to create a photo display wall.
